
Welcome back everyone! We’ve all been cooped up for a while now with things only just starting to return to normal. It’s been a rollercoaster ride and I think we’ve all earned ourselves a nice treat! So, enter stage left our vegan honeycomb treats! Read on to discover how you can make this delicious sweet treat that will melt in your mouth!
Why make honeycomb?
If you’ve ever eaten a Crunchie, then you know the delight of wolfing down a chocolate-covered honeycomb treat! However, those of us with milk allergies/intolerances or those of us on plant-based diets need a suitable alternative as Crunchies contain milk powder, whey powder (from milk) and milk fat. On our Instagram stories, and in the recipe below, I’ll be showing you how I make honeycomb from golden syrup, agave nectar, granulated sugar, and a few other baking ingredients you’ll probably have in your cupboard. Most honeycomb is vegan, but some people add actual honey to create a distinct honey flavour. In this recipe, we’ll be using agave nectar to add a slightly lighter flavour. Honeycomb is quick to make and requires you to add certain ingredients very quickly, so it’s best to have everything measured out and close by!
What can I expect?
Honeycomb is made predominantly with sugar which gets extremely hot when melted. It can also burn quickly, which is why we’ll be heating the sugar mixture to a specific temperature – I’ll be using a sugar thermometer. However, I have included the time it took my honeycomb mixture to reach the right temperatures if you don’t have a sugar thermometer. Just to mention again, the honeycomb mixture will be very hot, so please do be careful. I wore oven gloves to protect my hands and arms when it came to stirring and pouring the hot mixture. So, do ensure you’re taking the right steps to minimize any accidents.
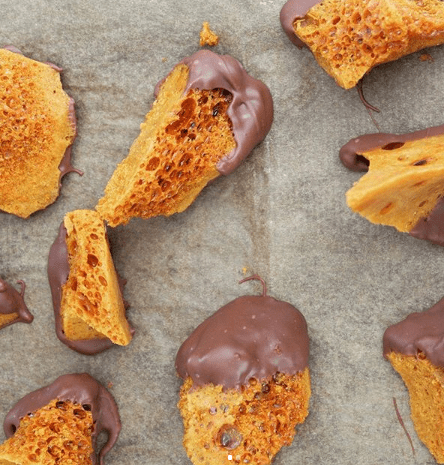
I decided to dip the honeycomb into some dark chocolate, but you could always have them as is! However you like to enjoy them, please do let me know as I love hearing how you get on!
If you’ve enjoyed today’s mouth-watering treat, then you might like some of our other vegan recipes:
You can view our entire selection of recipes here on our website. Why not give us a follow over on our Instagram, Facebook, Twitter & LinkedIn to keep up to date with future creations too!
Vegan Honeycomb
Equipment
- 9” x 9” Baking Tray
- Parchment Paper
- Large Saucepan
- Sugar Thermometer
- Wooden Spoon
- Sieve
- Oven Gloves
- Wooden Mallet, or similar
- Bowl
Ingredients
- 355 g Granulated Sugar
- 185 g Golden Syrup
- 2 tsp Agave Nectar
- 2 tsp Bicarbonate of Soda
- ¼ tsp Cream of Tartar
- 125 ml Water
- 150 g Chocolate Chips melted (optional)
Instructions
- To begin, weigh out all of the ingredients.
- Line a 9”x9” baking tin with parchment paper. Ensure that the edges of the parchment paper rise up taller than the edge of the tin by a few cm. This is to allow the honeycomb to rise up against the sides before it sinks again.
- Add the water, sugar, and golden syrup to a large saucepan.
- Briefly stir the mixture once to barely combine the ingredients.
- Using a sugar thermometer, heat the mixture on medium-high heat to 140°C. If you don’t have a sugar thermometer, I found that this step took me about 7-9 minutes.
- Now, quickly add the agave nectar and heat up to 150°C. This step took about 1 minute.
- Remove the saucepan from the heat and immediately sift over the bicarbonate of soda and cream of tartar.
- Using a wooden spoon, stir the mixture together for about 30 seconds, or until the powders have dissolved.Be careful as the honeycomb mixture is very hot - I used oven gloves to protect my hands.
- Pour the mixture into the prepared baking tray. Do not level out the top - we want to keep as many air bubbles as possible – let the honeycomb fill the baking tray naturally.
- Leave the honeycomb to cool for about 2-3 hours.
- After the honeycomb has cooled, break up the slab into smaller pieces with a wooden mallet or similar.
- Feel free to eat the honeycomb now or you can continue on to turn these into mini Crunchies!
- Melt the chocolate.
- Prepare a baking tray with parchment paper.
- Dip as much of the honeycomb as you like into the chocolate.
- Place the chocolate-covered honeycomb onto the parchment paper and put the tray into the fridge to set the chocolate.
- Serve & enjoy!