Hello bakers! I’m back with another delicious, vegan and nut-free dessert! Today’s Bakewell-style tart has been borne out of my mum’s nut allergy, so I won’t be using any almonds. I will, however, be capturing everything that makes any Bakewell tart amazingly moreish, but with a vegan and nut-free twist!
Bakewell tart is a variant of the dessert Bakewell pudding that originates from the town of Bakewell in Derbyshire. Bakewell pudding is normally made with a flaky pastry base, a jam layer, and an egg & almond topping. The Bakewell tart is similar but with a shortcrust pastry, jam layer and normally a frangipane filling topped with flaked almonds and sometimes thick icing. Frangipane is an almond sponge that is light and fluffy but, obviously, contains nuts. Therefore, nut allergy sufferers have been missing out on the delicious Bakewell tart – until now!
What can I expect from this Bakewell Tart?
Today’s recipe consists of four components: a perfectly baked pastry, a jam of your choice, a vegan & nut-free vanilla sponge, and optional icing. Simple, right? Let’s break down each step.
The Perfect Pastry
To achieve the perfect pie crust, I’ll be explaining how to blind bake pastry. Blind baking means baking the pie crust in such a way that partially cooks it before you add any filling. I’ve always struggled with my pastry shrinking in the pie dish during the blind baking stage. No matter how many recipes I’ve tried, it just never seems to work for me how it works for the chef I’m following. So, I came up with my own way of guaranteeing a perfectly cooked pastry, without any shrinking, and a neat edge. Check out the method below for how this is done.
Jams or Spreads
Next is our jam. I’m using shop bought because it is much more convenient and timesaving. In this recipe I used raspberry seedless jam but that’s just because I happened to have some to hand. You can use any jam you like, strawberry, blueberry, damson…or cherry jam if you want a cherry Bakewell. You could even use marmalade if you want an orange twist. And while we’re at it, you could try a chocolate spread or lemon curd – although I haven’t tried this myself so can’t vouch for the success rate!
Free-From Sponge
The next component, our vanilla sponge, is guaranteed to be light and fluffy! I’ll be using a vegan “buttermilk” to create that perfect pillowy texture. Buttermilk is just another way of saying ‘sour’ milk. That’s because it’s made by adding vinegar or lemon juice to milk. In our case, we’ll be using plant milk. I tend to use soy milk and have had a great success rate with that but do let me know how it goes with other plant milks. We’ll also be using aquafaba to replace the eggs in this recipe and keep it vegan.
Icing on the Tart!
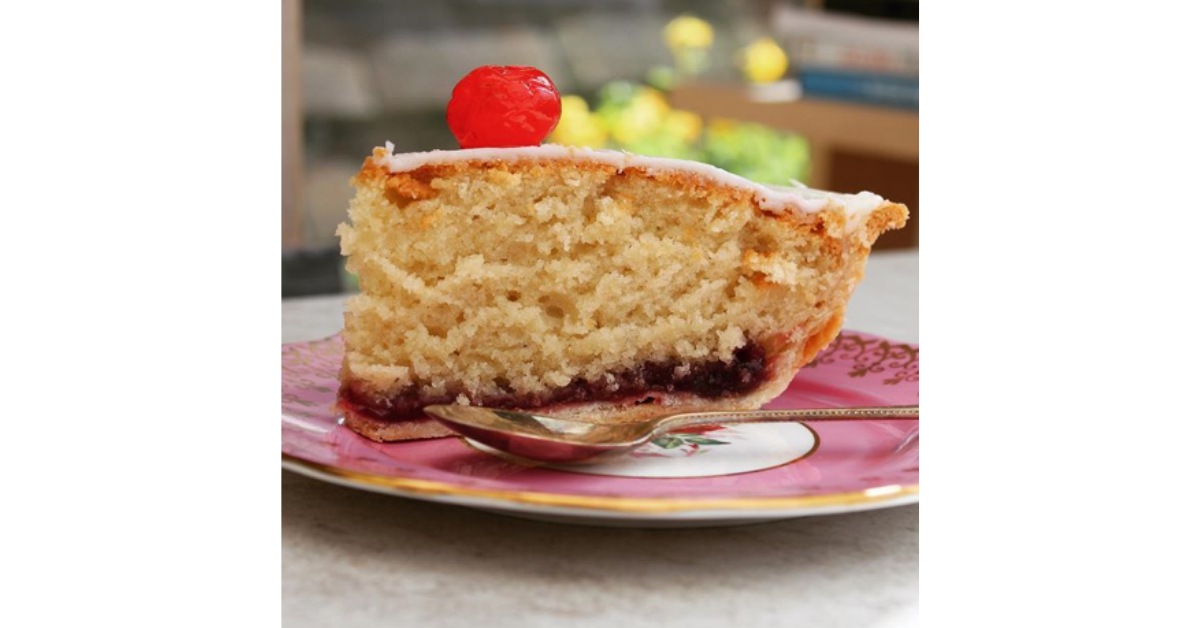
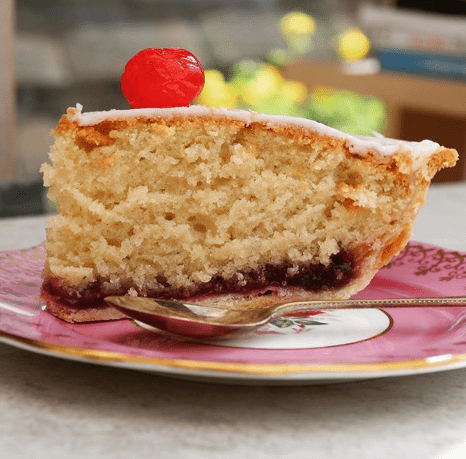
The final component really captures the essence of a classic Bakewell Tart. We’ll make a thick, dairy-free icing to top the Bakewell tart and, finally, add a cherry on top! The icing is an optional extra as you can simply serve the Bakewell as is, just lightly dusted with some icing sugar.
You don’t need the Great British Bake Off (sadly not able to return this Summer) to get you into the summery baking mood! This treat certainly does the trick – and there are definitely no soggy bottoms!
You can view our entire recipe selection here on our website. Why not give us a follow on our Instagram, Facebook, Twitter & LinkedIn to keep up to date with future creations?
Until next time, Soupologistas!
Vegan Bakewell Tart
Equipment
- Rolling Pin
- Pastry Dish (I used a 9” Fluted Pan)
- Parchment Paper
- Baking Beans
- Large Mixing Bowl
- Hand Mixer or Whisk
- Spatula or Similiar
- Sharp Knife
Ingredients
- 350 g Shortcrust Pastry
- 60 g Aquafaba
- 50 g Vegetable Oil
- 230 g Self-Raising Flour plus more for dusting
- 5 tbsp Jam
- 145 g Caster Sugar
- 1 tsp Vanilla Bean Paste or Vanilla Bean Extract or Essence
- 55 g Margarine
- 125 ml Plant-Based Milk + 1 tsp Apple Cider Vinegar
For the Icing (optional)
- 200 g Icing Sugar
- 3 tbsp Plant-Based Milk
- Glacé Cherries optional
Instructions
For the Pastry:
- To begin, preheat your ovento 180°C/350°F.
- Next, generously dust a clean work surface, your rolling pin and the shortcrust pastry with flour to prevent any sticking.
- Roll out the pastry so it’s large enough to fit your pastry dish.
- Carefully lay the pastry into the dish. Try not to stretch the dough too much as this often leads to the dough shrinking when baked.
- In order to get a perfectly shaped edge on the pastry case, we’re going to leave some of the pastry overhanging. If you have a lot of overhanging pastry, you should tear off a little bit as gravity will take hold and end up tearing the pastry if the overhang is too heavy. So, leave a good 3cm of overhang all the way around the pie dish and we’ll neaten out the edge later.
- Place the parchment paper inside the pastry dish. Top Tip: Scrunch up the parchment paper, unravel it and then place inside the pastry dish. This will stop it from rolling itself back up and make it easier to place the baking beans.
- Pour the baking beans inside the pastry dish.
- Blind bake in the oven for 15 minutes.
For the Sponge:
- Meanwhile, in a large mixing bowl, add the margarine and caster sugar.
- Cream the margarine and caster sugar together. You can either beat together with a wooden spoon or an electric mixer. Initially, the mixture will almost resemble breadcrumbs. After about 2 minutes, it will come together smoothly.
- Add the vegetable oil and aquafaba with the vanilla extract, if using. Whisk for about a minute. Use a spatula to scrape down the sides of the bowl.
- Next, we’ll add the flour and buttermilk alternately. The best way to do this is to add ⅓ of the flour, beat it into the mixture, and then add half of the buttermilk and beat until smooth. Add the next 1/3 of flour and beat, then the rest of the milk and mix until smooth. Lastly, add the remaining flour and beat together until the mixture is just combined, but don’t overmix.
- Scrape down the sides of the bowl again and set aside.
For the Pastry:
- Remove the pastry dish fromthe oven.
- Carefully lift the parchment paper (with all the beans) out of the dish and set aside to cool – beware the baking beans are very hot when straight from the oven.
- To cut off the excess pastry and create the perfect edge, hold your knife perpendicular to the edge of the pastry dish and cut in a ‘sawing’ motion up and down all the way around the edge of the dish. Ideally you would use either a small paring knife or a straight-sided eating knife – you don’t want a serrated edge as it won’t cut as well. Don’t forget you can view this recipe in its entirety over on our Instagram Stories!
- Next, pierce all over the base of the tart with a knife or fork. This is to prevent large air bubbles from forming.
- Place the tart back in the oven for a further 5 minutes without the baking beans or parchment. If any air bubbles do form at this stage, you can gently press them down with a knife or fork for a smooth base.
- Spread the jam of your choice all over the base of the tart.
- Then, pour over the vanilla sponge mixture.
- Place back in the oven for a further 25-30 minutes. You can tell when the sponge is cooked by poking into the sponge with a skewer. If the skewer comes out completely clean, then it’s baked!
- Allow the tart to cool!
- To serve, dust all over with icing sugar or follow the instructions below for a thick icing.
For the Icing:
- Whisk together the plant milk and icing sugar until smooth.
- Spread evenly over the Bakewell tart. Top with a glacé cherry!
- Enjoy!